Knowing how to attack from transition zone pickleball situations is one of the fastest ways to upgrade your offensive game. This guide breaks down exactly when to pull the trigger, which shots to use, and how to stop bleeding points in no-man’s land.
Knowing how to attack from the transition zone in pickleball is the difference between players who stay stuck at 3.5 and players who break through to 4.5 and beyond.
Most rec players treat the transition zone like a minefield, head down, survive, get to the kitchen.
The best players treat it like a loading dock. They’re already setting up their next attack before their feet even reach the NVZ line.
Here’s what actually separates those two groups: it’s not footwork.
It’s not paddle speed. It’s shot selection intelligence, and it starts the moment you step into no-man’s land.
Love pickleball? Then you’ll love our free newsletter. We send the latest news, tips, and highlights for free each week.
What Is the Transition Zone (and Why Most Players Waste It)?
The transition zone, also called no-man’s land, is the area between the kitchen line (NVZ line) and roughly the middle of the court. According to USA Pickleball’s 2025 Official Rulebook, it’s not an officially named zone, but every coach and competitive player knows exactly what it means: you’re not at the net yet, and you’re not at the baseline either.
Most players rush through it as fast as possible. The logic makes sense on the surface: get to the kitchen, get control. But that thinking leaves a massive opportunity on the table.
When your opponent’s shot sits up, above net height, floating toward the middle of your body, you have an attackable ball. It doesn’t matter that you’re mid-court. The transition zone is actually one of the best places to attack from because you’re closer to your opponent than you’d be from the baseline, and the ball hasn’t had time to drop into a difficult position.
The players who understand this are the ones winning points before they ever reach the NVZ line.
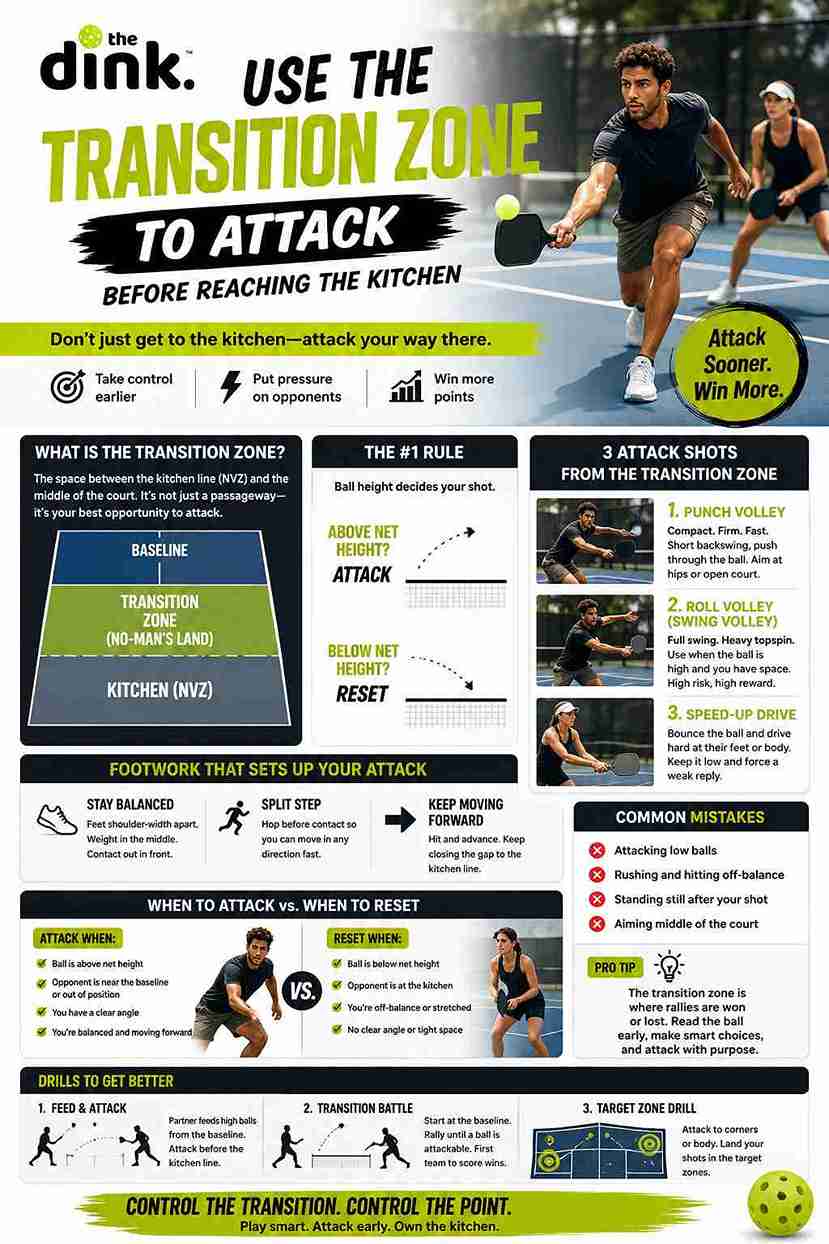
The One Rule That Changes Everything: Ball Height Decides Your Shot
Here’s the framework. Burn it into your decision-making:
Above net height: attack. Below net height: reset or drop.
That’s it. That’s the whole mental model. Shot selection in pickleball doesn’t need to be complicated. When the ball is high, you attack. When it’s low, you defend. The mistake most mid-level players make is attacking low balls out of no-man’s land and watching them sail into the net or pop up for an easy put-away.
A ball that sits above tape height in the transition zone is an invitation. Your opponent made a mistake. Punish it. A ball that’s below the net? That’s a reset situation, not an attack situation. Reset better first, and you’ll get another opportunity.
This single filter, height-based decision making, immediately cleans up the unforced errors most players are hemorrhaging in the middle of the court.
What Does “Attacking from Transition Zone Pickleball” Actually Look Like?
When players talk about how to attack from transition zone pickleball situations, they usually mean two specific shots: the punch volley and the roll volley (also called the swing volley). Both are executed before the ball bounces. Both require you to read the incoming ball early and commit.
The Punch Volley A compact, firm push through the ball with a short backswing. You’re not swinging, you’re redirecting with authority. Aim at your opponent’s hip or into the open court gap. The goal is pace and placement, not power. This shot is the backbone of transition zone offense and it works equally well on both sides.
The Roll Volley (Swing Volley) This is the hardest you’ve ever hit a pickleball. You’re using a full swing motion on a volley, no bounce, explosive topspin, aimed low and fast over the net. It’s a high-risk, high-reward shot. Use it when the ball is genuinely sitting up well and you have space to wind up. Misread this one and you’ll pop it sky-high.
The Speed-Up Drive If the ball bounces in the transition zone and sits up, you can also opt for a hard drive at your opponent’s feet or body. Driving through transition is riskier than volleys because you’re giving your opponent time to react, but a well-placed drive at hip level forces an uncomfortable defensive reply.
You can’t attack from a position you can’t hold. Footwork in the transition zone is what separates players who execute these shots cleanly from players who shank them into the net.
Three non-negotiables:
- Stay balanced. Don’t lean forward or backward when you contact the ball. Weight through the middle. Feet shoulder-width apart. Contact point out in front of your body, not jammed into your chest.
- Split step before contact. Every time your opponent hits the ball, your feet should hop into a ready position. This small movement, a split step, prepares your body to move in any direction and is why good players always look calm under fire.
- Keep moving toward the kitchen. Attacking from the transition zone doesn’t mean stopping there. Hit and advance. After your punch volley or roll volley, your feet should immediately continue toward the NVZ line. You want to be closing ground, not standing still admiring your shot.
Court positioning in doubles adds another layer: both partners need to be moving together. One advancing while the other stalls creates court coverage gaps that smart opponents exploit immediately.
When Should You Attack vs. When Should You Reset?
This is the real question. And honestly, the answer is not as complicated as people make it. The key to good shot selection in the transition game comes down to three factors: ball height, court position, and your opponent’s position.
Attack when:
- The ball is above net height
- Your opponent is near the baseline or scrambling
- You have a clear angle to a hip, gap, or body shot
- You’re moving forward and have momentum behind the shot
Reset when:
- The ball is below the net or skidding low
- Your opponent is already at the kitchen, ready to handle pace
- You’re off-balance or still moving laterally
- You just hit a poor third shot that didn’t drop
Three options from the baseline are also worth knowing, because the decisions you make at the baseline directly influence what opportunity you’ll have in the transition zone on the next shot.
Here’s the thing: most players default to resetting everything. That’s actually safer at the rec level, so it makes sense. But it also makes you completely predictable. Mixing in attacks from transition zone pickleball situations keeps opponents honest and forces errors at the net.
Why Pros Attack from Transition Zone Pickleball Situations More Than You Think
Watch a PPA or MLP match at full speed and you’ll see top pros taking shots mid-court regularly. Players like JW Johnson and Tyson McGuffin are not waiting to reach the kitchen before going on offense. They’re reading the ball early, attacking high balls in stride, and forcing opponents back.
This is not reckless play. It’s calculated aggression. The transition zone attack works because it compresses time. Your opponent has less time to react to a punch volley fired from mid-court than they do to a drive hit from the baseline. The closer you are to the net when you attack, the harder it is to defend.
Advanced drill work on shot selection reinforces this at the practice level. If you’re not building these transitions into your drills, you’re only training part of the game. The pressure zone in pickleball is often the transition zone, and players who can both apply and withstand pressure there win more.
Drills to Build Your Transition Zone Attack
You don’t need a coach or a ball machine to work on this. Two-player drills are enough.
Drill 1: Transition Zone Attack Trigger One player feeds soft balls from the kitchen. The second player starts at the baseline, hits a third shot drop, then advances. The feeder intentionally floats one ball above net height during the transition. The advancing player identifies it and attacks, punch volley or roll volley. Reset everything else. Building this trigger response is the whole point.
Drill 2: Move and Attack Both players start at the baseline. Rally cross-court from mid-court. Any ball above net height is a green light to attack. The point resets if the ball goes in the net. This mirrors real game patterns and forces players to make live decisions rather than choreographed ones.
Drill 3: Drive or Drop Decision One player feeds balls alternately low (ankles/knees) and high (shoulder). The transitioning player must call “drop” or “attack” before they hit. Drilling drive vs. drop decisions is one of the most underrated practice investments a 3.5–4.0 player can make.
The Shot You’re Ignoring: The Body Attack
Most players aim for corners. That’s fine. But in the transition zone, one of the highest-percentage attacks is straight at the body, specifically at the right hip of a right-handed opponent, or the backhand hip on either side.
A body attack creates a jammed position that’s hard to counter cleanly. Your opponent has to make a decision: forehand, backhand, or get out of the way. Under time pressure from a mid-court punch, they’ll often mis-hit. It’s not flashy. But it works at every level from 3.5 to pro.
Deception in shot selection adds even more teeth to this: if you’ve been attacking corners, suddenly firing at the body catches opponents shifting weight the wrong way. Mix it up. Predictability is a bigger weakness than lack of power.
Common Mistakes When Attacking from the Transition Zone
Even players who understand the concept make the same recurring errors. Here’s what to watch for:
- Attacking low balls. The most common mistake. If the ball is below net height when you contact it, you need extreme lift to clear the net, which pops the ball up. Attack only above-net balls.
- Swinging too big. In the transition zone, compact strokes beat full swings. Long backswings take more time and reduce control. Keep it tight.
- Stopping to attack. Players often plant their feet to set up an attack, then stall mid-court. You need to attack AND keep moving toward the kitchen. Forward momentum is part of the shot.
- Over-committing to pace. Pace without placement is useless. A well-placed punch at 60% effort beats a wild drive at 100% effort every time.
Good shot or bad positioning?, that’s a question worth asking every time you miss. Most transition zone errors are positioning problems, not paddle problems.
Key Takeaways
- The transition zone (roughly the area between the baseline and kitchen line) is not just a zone to survive, it’s a zone to attack from when the ball sits up.
- Ball height is your decision trigger. Anything above net height is attackable. Anything below demands a reset or drop.
- Punch volleys and roll volleys are your primary offensive tools while moving through the zone.
- Staying balanced with a ready position and split step lets you shift from defense to offense instantly.
- Pros attack from transition zone pickleball situations regularly, learning to do the same is a real competitive edge.
💡
Frequently Asked Questions
What is the transition zone in pickleball?
The transition zone in pickleball, also called no-man’s land, is the area between the non-volley zone (kitchen) line and roughly the midpoint of the court. It’s the zone players pass through after hitting a third shot or return, while advancing toward the net. It’s considered a vulnerable position because players are neither in position to dink safely nor far enough back to reset with comfort. Understanding how to attack from transition zone pickleball situations converts this vulnerability into an offensive weapon.
When should you attack from the transition zone in pickleball?
You should attack from the transition zone when the incoming ball is above net height. That’s the primary trigger. If the ball is sitting up, especially above your waist or shoulder height, a punch volley or roll volley is the right move. If the ball is at or below net height, you should prioritize a soft reset or drop instead. Reading ball height quickly is the core skill that enables consistent, smart aggression from this part of the court.
What shots work best when attacking from the transition zone?
The two most effective shots for attacking from transition zone pickleball situations are the punch volley (a compact, firm redirect, no bounce) and the roll volley (a full swing volley with topspin, also called a swing volley). A hard drive is also viable if the ball has bounced and sits up. Of these, the punch volley is highest percentage because it requires less swing and keeps you moving forward. Aim at the opponent’s body or an open-court gap for best results.
How do you stop making errors in the transition zone?
The most common cause of transition zone errors is attacking balls that are too low. Establish a simple rule: if the ball is below net height when you contact it, you are not attacking. Reset it instead. Second, stay compact in your swing. Big backswings in the transition zone cause mishits and take too long. Third, keep your feet moving, standing still in the transition zone makes you both slower to react and easier to target.
Does attacking from the transition zone work in doubles?
Yes, and it’s especially effective in doubles because a mid-court attack compresses your opponents’ reaction time. The key is coordination: both partners should be advancing together. If one player stops mid-court to attack while the other hangs back, you create court coverage gaps. Attack from transition zone pickleball situations as a unit, one player fires the punch volley while the other anticipates the counter and keeps closing toward the kitchen line.
Final Word
The transition zone is not a penalty box. It’s an opportunity.
Players who treat it that way, who read ball height, pick their moments, and attack with purpose, win more points, create more chaos for opponents, and reach the kitchen in a far stronger position.
You don’t need to overhaul your entire game. You need one habit: look at ball height the instant your opponent contacts the shot.
If it’s sitting up, you’re attacking. If it’s not, you’re resetting and waiting for a better ball.
That one mental shift, applied consistently in practice and match play, is one of the fastest skill investments you can make to move up a full rating level.
Nguồn: thedinkpickleball